Grackle & Sun

Archive for the tag “dyes”

The Fast and the Fugitive: Pokeberry Edition

It is once again time to play…

IMG_0001

OR

IMG_0002

I sandwiched the samples from each of the original pokeberry dyebaths between heavy cardboard and taped it up against a south-facing window for a month.  All yarn is 100% wool mordanted with vinegar only.  Here are the results:

Pokeberry–First Dyebath

Pokeberry Lightfastness Test Results 11-17-2012 2-25-02 PMPokeberry Lightfastness Test Results 11-17-2012 2-24-25 PM

Pokeberry–Second Dyebath (First exhaust)

Pokeberry Lightfastness Test Results 11-17-2012 2-26-29 PMPokeberry Lightfastness Test Results 11-17-2012 2-26-05 PM

Pokeberry Lightfastness Test Results 11-17-2012 2-27-47 PMPokeberry Lightfastness Test Results 11-17-2012 2-27-35 PM

Pokeberry—Third Dyebath (Second Exhaust):  These are on superwash wool.  Somehow I didn’t test the skein of regular wool from this bath.  Not sure why.

Pokeberry Lightfastness Test Results 11-17-2012 2-29-10 PMPokeberry Lightfastness Test Results 11-17-2012 2-28-43 PM

Pokeberry—Cold Dyebath

Pokeberry Lightfastness Test Results 11-17-2012 2-30-47 PMPokeberry Lightfastness Test Results 11-17-2012 2-30-05 PMSo far, I think everything is as should be expected.  We know that pokeberry is not normally lightfast, but that with proper mordanting and dyeweight ratios, can be made more so.   You can see a substantial difference in the lightfastness between the original dyebath and the two exhaust baths.  Here is the good news.  This lightfastness test was conducted in a room in my house lovingly known as The Snug, short for Snuggery, aka the Sun Room.  It is a very tiny little nook of a room made entirely of mullioned windows.  For the purposes of this post, that means that anything in the room gets not only full south-facing sun, but also east and west sun, as well.  The photos you’ve seen so far are of the side of the yarn which had direct south-facing exposure pressed right up on the glass.  The next series of photos are of the back side of the exposed yarn—the side exposed to normal daily levels of ambient light from the east and west windows.  You can just see the outlines of the direct-exposed areas.  It’s like the yarn has tan lines.  Look at this:

First Dyebath

Pokeberry Lightfastness Test Results 11-17-2012 2-25-17 PM

Second Dyebath (First Exhaust)

Pokeberry Lightfastness Test Results 11-17-2012 2-26-42 PMPokeberry Lightfastness Test Results 11-17-2012 2-28-01 PM

Third Dyebath (Second Exhaust)

Pokeberry Lightfastness Test Results 11-17-2012 2-29-23 PM

Pretty cool, huhn?  The first dyebath had almost no fading on the ambient-exposed side of the yarn.  The exhaust baths had very little.  I think this is a good sign that these pokeberry dyed yarns will stand up to regular wear in normal lighting.  I mean, it’s not like anyone is going to be wearing handknit items when the UV levels are crazy high, so I’m not terribly worried about it.  I’m particularly impressed with the cold dye process.  Not only did it dye awesomely, but it was the most lightfast out of the bunch, too.  The back side of the sample was as purple as the covered section.  It was just hard to get a good picture of it.

Next, I’ve got to get lightfastness tests of the raceme dyelots.  Gotta wait for more sun, though.  Until then,

Live happy, dye happy!

At the Burrow DyeTable # 8: Pokeweed Racemes, Take 3

Here is the third and final installment of this first round of pokeweed raceme dye experiments.  I think the racemes are so beautiful.  I’d say “otherworldly”, but it’s hard to think that of anything born out of Missouri Ozark clay and rock.

Dye Notes:

Dyestuff:  Pokeweed (phytolacca americana)

Parts used:  The racemes (the part that holds the berries)

Source:  My yard, the Haggencrone’s yard, my friend Debbie’s yard, and the Farm

Yarn:  Mountain Meadow Cody, 100% wool.  I mordanted a little differently this time, opting not to follow any instructions other than those given by the seat of my pants.  I decided to use more vinegar, and pretty much did a 1:3 ratio of white distilled vinegar to water.  The reason for this is that in lieu of using straight acetic acid, I’m hoping the higher acid content will help with the fastness of this dye.  So I soaked 100g of wool yarn in a pot of 1/4 vinegar to 3/4 water.  I heated the pot to 190F and held it there for an hour.  Then I let the yarn sit and cool in the mordant bath overnight.  The starting pH at room temperature was 3.1.  At 188.2F, it was 3.0.

Ratio of dyestuff to fiber:  I only used half of the yarn I mordanted for this particular dyebath, so 50g total.  I’m not sure of the exact amount of racemes.  I didn’t weigh them out, as this was done on a whim.  But I can tell you that when I pulled them all from the bucket, they easily weighed a pound.   I’m sure most of that was the vinegar that they absorbed., so I’m going to say maybe 100g starting weight, and next time I promise to weigh them out.

Extraction:   Chucked the racemes into a bucket and covered them in white distilled vinegar.  Put a plate on top to hold them down.  Left them on their own for a couple months.   As you can see, these didn’t leach out the way the other ones did.  I think had I put much more vinegar in, they would have.  They were pretty compacted in this bucket.

Dyebath:  After the recent success with the cold pokeberry dyebath, I knew that I had to try a cold raceme dyebath, too.  I strained out the racemes through a colander and reserved half of the liquid for the cold dyejar (the other half was used for the hot dyebath).  I added the premordanted yarn and brought the dyejar inside the house, because I was afraid it might freeze and crack if left outside.  I kept it covered with black cloth (actually, just a black shirt—sorry if that is less poetic) to block out the sunlight.  The yarn sat undisturbed for 9 days.

The results?

WOOT!!!  Slam dunk and SCORE!  Cold dyeing with poke is the way to go.

Here is a picture of all 3 pokeweed raceme experiments together:

Fascinating, don’t you think?  That such totally different colours could come from the same plant, the same part of that plant, on the same yarn, and with the same mordant—just because of a difference in the specific dyebath process.  Very cool.  So does anyone want to hazard a guess as to why the cold process put the red on the wool when the heated baths didn’t?  Next I’ll put samples from these 3 up for a lightfastness test.  Will be interesting.  Here’s to curiousity and experimentation!

Live happy, dye happy!

At the Burrow DyeTable # 8: Pokeweed Racemes, Take 2

You have seen the results of the first pokeweed raceme experiment, but that is not all that has been cooking!  Unbeknowst to you, I have been extracting a second bucket of pokeweed racemes!   :D  How cool is that?  Mas racemes.  Pretty fun.

Dye Notes:

Dyestuff:  Pokeweed (phytolacca americana)

Parts used:  The racemes (the part that holds the berries)

Source:  My yard, the Haggencrone’s yard, my friend Debbie’s yard, and the Farm

Yarn:  Mountain Meadows Cody, 100% wool.  I mordanted a little differently this time, opting not to follow any instructions other than those given by the seat of my pants.  I decided to use more vinegar than used in the vinegar mordant for the pokeberry dyebaths, and pretty much did a 1:3 ratio of white distilled vinegar to water.  The reason for this is that in lieu of using straight acetic acid, I’m hoping the higher acid content will help with the fastness of this dye.  So I soaked 100g of wool yarn in a pot of 1/4 vinegar to 3/4 water.  I heated the pot to 190F and held it there for an hour.  Then I let the yarn sit and cool in the mordant bath overnight.  The starting pH at room temperature was 3.1.  At 188.2F, it was 3.0.

Ratio of dyestuff to fiber:  I only used half of the yarn I mordanted for this particular dyebath, so 50g total.  I’m not sure of the exact amount of racemes.  I didn’t weigh them out, as this was done on a whim.  But I can tell you that when I pulled them all from the bucket, they easily weighed a pound.  But I’m sure most of that was the vinegar that they absorbed.  I’m going to say maybe 100g starting weight, and next time I promise to weigh them out.

Extraction:   Chucked the racemes into a bucket and covered them in white distilled vinegar.  Put a plate on top to hold them down.  Left them for a couple months.   As you can see, these didn’t leach out the way the other ones did.  I think that had I put more vinegar in, they would have.  They were pretty compacted in this bucket.

Dyebath:  I strained out the racemes and reserved the dye liquor, pouring it into the dyepot.  To this I added the remains of the mordanting bath.  The starting pH of the dyebath was 3.5.  I gently raised the temperature to a window between 175-195F.  At temperature, the pH was 3.2.  I held the bath in this temperature window for 2 hours and then let the yarn cool in the pot overnight.

The results?

Again, unexpected.  This time we had a much higher dyestuff to fiber ratio, but we still didn’t get the red that they dyebath seemed to promise.  Why?  I’m not sure.  I think it could be one of several things.  1)  Perhaps although the bath looks red, there really isn’t enough of that compound in it to dye the yarn?  2)  Although the dyebath never boiled, perhaps it would have preferred to stay under 190F?  Even the next morning, when I took the yarn out, the bath was still full of colour.  It just wasn’t on the yarn.  Will have to play with this more…  Anyway, I think it’s a lovely soft yellow ochre, and I’m sure I’ll find something nice to knit with it.

Here you can see it next to the all-in-one raceme skein from the day before.  I am surprised that the slight difference in dye methods yielded such different tones.  Or was it something inherent in that first batch of racemes collected earlier?  Could it be due to the complete leaching of those first racemes?  I’m not sure.  Two nice colours, I think, though.  I’m eager to see how their lightfastness test turns out…

Live happy, dye happy!

At the Burrow DyeTable # 8: Pokeweed Racemes, Take 1

When I first started gathering the berries of the phytolacca americana, aka the glorious pokeweed plant, I threw the racemes into the compost heap after carefully removing all the precious berries.  Everyone says to just dye with the berries.  But I do so love to figure things out for myself, and besides, just because someone said so isn’t a great reason for doing anything, is it?  So when my curiousity got the better of me (although arguably, it makes me better, so I’ll keep it),  I decided to see if I could extract any colour from the racemes themselves.

Dye Notes:

Dyestuff:  Pokeweed, phytolacca americana

Parts used:  The racemes (the part that holds the berries)

Source:  My yard, the Haggencrone’s yard, my friend Debbie’s yard, and the Farm

Yarn:  Mountain Meadows Cody mordanted in vinegar.  I did the mordanting a little differently this time.  I basically mordanted in straight vinegar as part of an all-in-one dyepot.

Ratio of dyestuff to fiber:  To be honest, I have no idea how many grams of racemes I had here.  I’d guess maybe 40g or so.  The hank of wool was 50g.  So, I probably did not get a 1:1 ratio.  But I really wanted to dye the whole hank.  It’s hard sometimes to figure out what to do with all those mini-skeins.  There’s only so much end weaving I can handle, lol.

Extraction:  For this first batch, I put the racemes in pure distilled white vinegar to cover and left them for about 3 weeks.

To my surprise, when I took the racemes out to strain off the liquid (and mostly just to see what was going on in there) I found this:

All of the colour had been leached out of the racemes and magically put into the vinegar.  Pretty damn cool.  Presto change-oh!  And all the colour is in the liquid.

Dyebath:  I decided to do this dyebath as an all-in-one, meaning mordanting and dyeing all in one go.  Why not?  After all, it just requires a vinegar mordant, and the dye liquor is all vinegar… just seemed to make sense.  I didn’t want to have to add any more liquid to the pot, opting to leave it just the vinegar dye extraction.  There was just enough room for the yarn to float around, and since the racemes were totally bleached out already, I did not bother doing a heated extraction with them.  The starting pH of the dyebath was 3.4.

I slowly and gently heated it up to a temperature window of 175-190F.  At a temperature of 188.9F, the pH was 3.1.

I kept the dyebath in this temperature window for an hour, turned off the heat, and let the yarn sleep overnight in the pot.

The results?

Not what I expected at all.  Did you see how red that dyebath was?  And yet the yarn came out this lovely soft peach colour.  It’s ok.  I’m sure I’ll find something peachy to knit with this.  :D  Lesson learned?  Waste not, want not.   Not every dyestuff makes a colour that you’d want to repeat, but to me part of the fun of this great dyeing adventure is exploring all the variables, going down all the roads.  It’s not just about the end result.  Yes, a beautiful skein of yarn is a sweet, sweet bonus, but if that’s all I wanted, I could go buy that at any yarn shop.  That’s not why I’m here, though.  So, I’ll keep my dyestuffs extracting and keep my pots simmering and maybe one day I’ll figure this dyeing thing out.  I’m going to have a lot of fun trying.

Live happy, dye happy!

At the Burrow DyeTable # 7: Lychee LOSE & Walnut WIN

This whole dyeing thing never ceases to amaze me.  Just when I think maybe I’ve figured something out, the dyepot decides to teach me a lesson.

Call me grasshopper.

Back in May when I started the monster avocado pit extraction, I made another little experimental extraction on the side.  One day the kiddos were eating lychees, and I looked over and saw the pile of pits on the plate and a light bulb went off in my head:  if avocado pits can dye things, maybe lychee pits can, too!  So I took the pits and stuck them in a jar and covered them with ammonia and water just like I did for the avocado pits.  And you know what happened?  Let me show you…

Dye Notes:

Dyestuff:  Lychee

Part used:  Pits

Source:  Grocery store/Asian market

Yarn:  Lion Brand Fisherman’s Wool mordanted in 8% aluminum potassium sulfate and 7% cream of tartar

Ratio of dyestuff to fiber:  I used 18 lychee pits, which weighed out to roughly 54g.  The little skein of yarn was around 46g.  So I had slightly better than a 1:1 ratio, bonus points to the dyestuff.

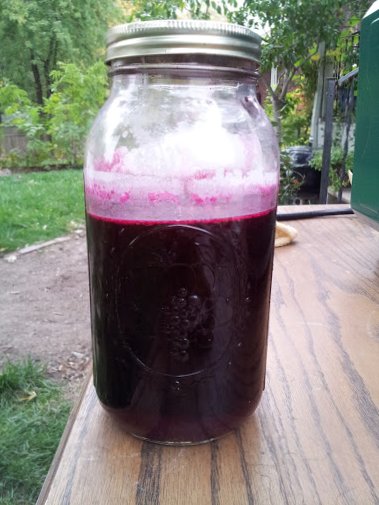
Extraction method:  I left the pits whole and put them in a jar with a 1:1 ratio of water to ammonia.  Started getting colour pretty fast.

This is just on day two.  I added more pits over the next few days.

The extraction went from this clear red to couldn’t-see-through-it brown in under a month:

Total extraction time, approximately 5 months.  I occasionally opened up the jar and shook it up to oxygenate the solution.  I’ve read that it helps other extractions, so I figured why not.  It never molded or got funky.  Just got darker and darker.

Dyebath:  So the pH of the lychee dye liquor was 9.8.  The pH of my tap water is 8.8.  Together they made a pH at room temperature of 9.1.  I didn’t measure out the amount of water since it’s not supposed to effect saturation of the dye, but I’d guess about a gallon to a gallon and a half of tapwater to the one jar (maybe 12 oz) of dye liquor.   I added the yarn and brought it up to a temperature window of 185-200F for an hour.  At this temp, the pH was 6.6.  Isn’t it amazing how much some of these solutions drop when heated?  Maybe it’s not.  I’m not a chemist, so I don’t know why it happens or if it effects the dye results, but I’d like to know.  When I’ve got more time on my hands, I’m going to try to sort this out.  Maybe someone’s done some research on it already…  I did not add the actual pits to the dyebath since the dye liquor was so strong already.

I left the yarn to cool overnight.  Only that turned into 2 nights.  And when I checked on it, I was surprised by the utter lack of saturation of any good colour.  Hmmmm.

So I decided to chop up the lychee pits, toss them in pantyhose and add the to the dyebath.  I reheated the whole shebang again for another hour and left  it overnight to cool one more time.

Results?

Nothing.  Zilch.  Next to no colour at all.  WTH?

Rinsed and awaiting my disapproval.

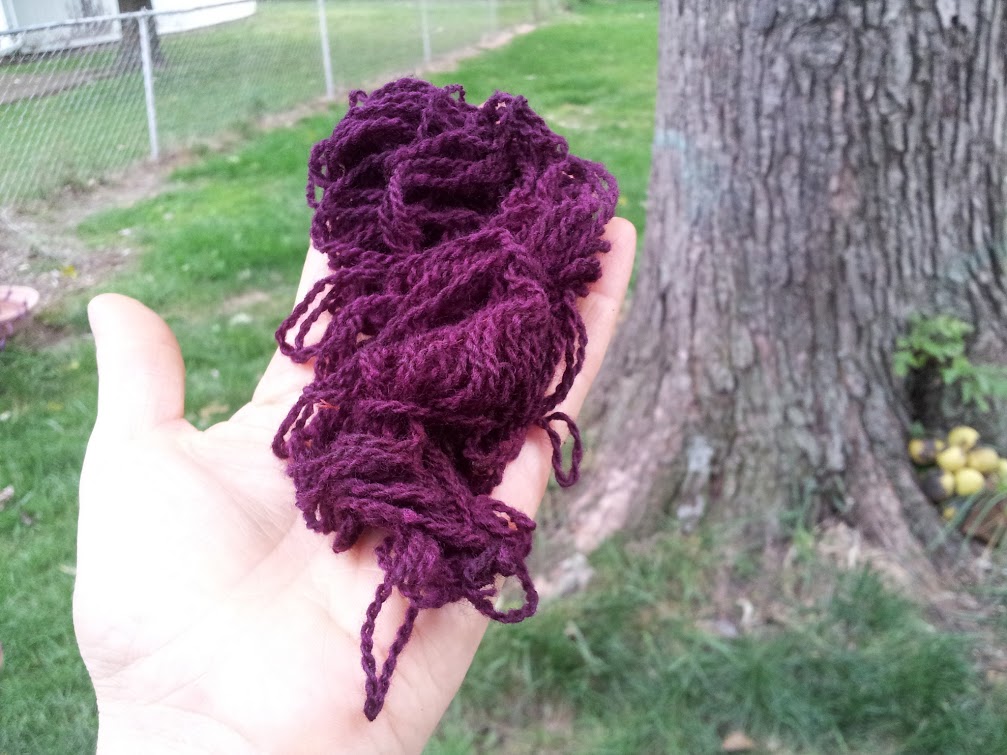
Lesson learned?  Just because you have a super saturated extraction doesn’t mean it will dye anything.  Maybe I did something wrong?  Maybe some dyestuffs just don’t dye well.  Maybe this would have worked on silk or hemp better than wool?  I don’t know, but I’d like to find out.  I know that this lychee thing can work.  I just have to figure out how…  But listen, we can’t end on a lame bummer dye job.  Besides this wasn’t a total FAIL, because the yarn was pretty much ready to overdye immediately.  So overdye I did.

On to Walnut WIN!

The last time I tried dyeing with walnuts wasn’t so successful.  I didn’t realize that though the nuts and shells will give off colour,  it’s the green hulls that do the real dyeing.  It took a failed dyebatch to learn that lesson.  But learn it I did, and then I waited patiently for a new batch of walnuts to fall.  Every autumn, my Gran asks for help clearing her yard of the millionty walnuts that fall from her neighbor’s tree.  Usually she just chucks them back into her neighbor’s yard (which makes me grin), but this year I was only too happy to help.  I took home two 5 gallon buckets, two 2 gallon bucket, and 3 trash bags full of walnuts.  That’s a lotta nuts.  I made the mistake of setting them outside until I could soak them.  We’ve got very, very ballsy squirrels in the city.  They helped themselves to quite a few of the nuts, tearing right into the trash bags to get them.  So much so, that I finally made a peace offering and emptied the remains of the 3 trash bags under the tree where our squirrel family lives.  I figured, they’ve got to survive the winter.  I just need some dye to play with.  No contest.  I did keep the two 5 gallon buckets and filled them with water.  After the squirrels took all the nuts under the tree—ALL OF THEM—they actually started taking walnuts out of the water in the big buckets.  So I replenished those with what was left in the 2 gallon buckets and then covered them.  I don’t know if it’ll be squirrel proof, what is?  But it seems to have slowed them down.  Enough for me to get one batch of dye, anyway.

Dye Notes:

Dyestuff:  Black Walnut (juglans nigra)

Part used:  Green hulls

Source:  The Haggencrone’s yard

Yarn:  Lion Brand Fisherman’s Wool mordanted with 8% aluminum potassium sulfate and 7% cream of tartar

Ratio of dyestuff to fiber:  No clue.  I just poured about a gallon of the dye liquor out of the bucket.  Again, it’s about a 46g hank of wool yarn.

Extraction method:  This is a pretty fresh batch of walnut juice.  It’s only been soaking in water for about a week or so.  Doesn’t take long to get good colour of of the hulls.  I’m told, though, that letting it all mold and ferment just makes for richer, darker browns.  It’ll be interesting to see what I get as time goes by.

Could totally do some scrying in this pot.

Dyebath:  The pH of the dyebath at room temp was 6.2.  I heated the dyebath to a temperature window between 185-200F.  The pH at 198F was 5.9.  I held the dyebath in this temperature window for just over an hour and then let the yarn cool in the bath overnight.

The Results?

Mad awesome brown.  Here it is fresh from the dyepot, rinsed and hanging to dry:

And here it is after drying:

This looks a smidge brighter since it’s in full sun.  It’s actually a little darker than this.  I’m really pleased with the results.  I’ll do a lightfastness test, but anticipate that it’ll hold up pretty well.  I opted not to modify with iron, because I really like the colour as is, but I would like to play around with some iron in the dyepot and as an afterdip.  Now I have to figure out what to knit…

Live happy, dye happy!

At the Burrow DyeTable # Five: Red Onion Revisited

After seeing the awesome green that my class got from the red onion skin dyebath the other day, I didn’t have the heart to chuck out the exhaust.  I knew that most likely my results from the same bath, which had been sitting on the back porch for 3 days, would be quite different, but I had yarn already mordanted practically screaming at me to go play.  So, play I did.  Husband kept me company, which made the whole thing infinitely more enjoyable, and I really like dyeing, so this was pretty damn good.

And, in the middle of it all, we heard a loud noise, looked up in the sky, and saw this behemoth flying low, low, low overhead.  Unexpected, right?  It had propellers.

Alright.  Back to work.

Dye Notes:

Dyestuff:  Red onions

Parts used:  The papery outer skins

Source:  The restaurant where I work, my kitchen, and grocery store onion bins

Ratio of dyestuff to yarn:  The original dyebath was roughly a .75:1 ratio of skins to yarn.  If I were to go strictly by weight for this exhaust bath, it would be about 200g onion skins to roughly 36g yarn, which is a just about a 5.6:1 ratio.  However, since this is an exhaust bath, and I have no idea how one would even begin to calculate how much dye has already been removed from the skins, the weight of said skins is very nearly meaningless.  I wish there was some way to figure it out, but it is beyond my arithmetical skillz, of which there are few.

Yarn:  Lion Brand Fisherman’s Wool mordanted with 8% aluminum potassium sulfate and 7% cream of tartar.

Dyebath:  Added just a little glug of white distilled vinegar before heating, thinking that lowering the pH might help me get the pinks that red onion are supposed to give in a more acidic bath.  The pH at room temp. was 3.6.  Once the bath came up to temperature (195F), I remeasured the pH to be 3.4.  Initially, when the yarn was added (at room temp.), it seemed to take in the claret colour.  But as soon as the bath started heating up, it became clear that it was going to turn toward yellow.  Eeeeeenteresting….  Held the dyebath between 175F-195F for 1 hour and then let the yarn cool in the pot for several hours.

The results?  A weird burnished golden green.  Here it is straight from the dyebath:

And here is the skein after being rinsed and dried.  That is NOT pink.

It’s hard to describe just what this colour is.  The picture doesn’t capture just how much of a strange, otherworldly green cast it has.  The best way to describe it would be to call it… tarnished.  I rather like it.  But it is not what I was expecting.

_____________________________________________________

Then later the same day another little hank of premordanted yarn called to me, and I decided to bump up the pH dyebath and try it one more time.  It still seemed to have so much colour in it.  So I added enough washing soda to get the pH up to 9.4 at temperature.  The colour of the bath immediately went from red to green.

In the original dyebath, after we got the pH over 9, we saw the same colour shift of the bath, but then it turned acidic (and red) again pretty quickly.  I assumed this was because I’d left the bag of onion skins in the bath and that they were still influencing the pH.  So this time, I took the bag out before bumping up the pH. I did, however, add a few fresh red onion skins I’d snagged from the restaurant this week.  No more than a couple grams.

But it didn’t make any difference.  Even though the bath stayed green for the hour that I heated it (in the same 175-195F window). after it was left to cool overnight, the next morning it was claret red again.

The results?  Not green.  Or pink.

So what was going on here?  I must begin with the disclaimer that I have no idea.  But if I were to guess, it would be that there are a couple different components to whatever compounds are in red onion skins that make them red, and that the uptake of those components occur at different times.  It is my understanding that if you take red onion skins and make a fresh dyebath with them, and leave the bath acidic, you can get pinks on your fiber.  If you take that same fresh dyebath and make it basic instead, you will get greens on your yarn—even though the bath looks red.   And that is exactly what happened with the original bath.   The kids got green yarn.  Very green.  Clearly, in the first exhaust bath, the green dye was all but gone.  In the second bath there was none left—even though the bath was alkaline.   So, I would venture to say that making the bath alkaline is what extracts the component that dyes green, and that it is taken up before the other components that dye either pink or yellow.  I would like to try red onion again and get pink from it, because I think this would help clarify what is happening chemically in this bath.  I’m really just guessing about all of it at this point.

Any of you have experience dyeing with red onion skins?  What do you think?

Live happy, dye happy!

At the Burrow DyeTable #Four: Forbidden

I have to apologize for my oversights, my rushing.  I like to suss things out.  To dig in up to my elbows for a bit, and then stand back and think on things before I jump back in the middle again.  But this requires time, and life has other ideas about what I’m supposed to be doing.   I rarely find the long, meandering swaths of hours that it requires for me to fully go deep into the Fetch and dance with my creative mojo.  Instead I have to steal minutes here and there and I end up hurrying through steps I’d rather linger over.  I forget my camera.  I forget my notebook.   I lose the flowing narrative and instead piece together fragments and partial thoughts and hope for poetry.

So it was when I dyed with forbidden rice.

This bag of black rice had been sitting in my pantry for months waiting for me.  I finally stole a moment for it.  Haphazard.  Slapdash.  Hardly the way one should treat something forbidden.  But that’s how it happened, and that’s what I must own.

Dye Notes:

Dyestuff:  Forbidden rice

Part used:  The grains of rice

Sourec:  Whole Foods bulk bin

Ratio of dyestuff to fiber:  412g of rice to 38g of fiber; just under 11:1 ratio.

Yarn:  Catnip Yarns Kona Superwash Worsted   38g, mordanted with 8% aluminum potassium sulfate and 7% cream of tartar.  I’m not usually a big fan of superwash, because the processes used to make yarn superwash are typically not terribly sustainable, and they frequently over-process the wool and make it lose its character.  This yarn, however, is absolutely scrummy.  It is super, super, super soft and has a beautiful sheen.  Absolutely lovely.  I don’t know how they did it, but next time I need superwash, it will be Kona for sure.

Extraction:  I soaked the rice in tapwater overnight (about 10-12 hours).  Pretty much just like I’d do black beans.  Didn’t measure pH.  Gasp!

Dyebath:  I strained out all the rice through a colander and reserved the liquid.  It didn’t seem to have as much particulate in it as black bean juice does, so I did not bother with ladling the liquid off the top of the bowl and instead used all of it.  I put the dyebath and yarn in a stainless steel bucket and left it outside.

After roughly 40 hours, I rinsed the skein in plain water and hung it to dry.

The results?  A colour I like to call Sickly Lavendar.  Or Lavendar Lite.  Or Maybe One Day I’ll Grow Up and Become A Real Lavendar!

It’s got a couple spots that lean toward blue.  The overal colour is a little mottled, which actually makes the effect more interesting, I think.  After doing this experiment, I went on Ravelry and did a search to see if anyone has played with black rice.  A few people talked about it, but I only saw one actual result, and it was a very pretty deep lavendar-blue.  The difference?  She didn’t treat it like black beans at all—-she simmered hers!  Clever!  I’m thinking about getting more rice and either overdyeing this skein or dyeing a new skein with the hot technique to see the difference.

It’s been fun these last months playing with dyes from foodstuffs.  It makes me look at everything I eat with an eye for the potential dye hidden under the surface…

Live happy, dye happy!

At the Burrow DyeTable # Six: Poke for Pia

My fiber friend, Pia, asked me to do a little experiment for her.  She asked me to do a cold dye process with the pokeberries.  And so I did.  After all, far be it from me to ignore an opportunity to experiment, to leave our curiousity hanging.  Thank you, Pia, for your request.  I would not have thought to run a cold dyebath with pokeberries.

Dye Notes:

Dyestuff:  Pokeweed (phytolacca americana)

Parts used:  The berries

Source:  My yard, the Haggencrone’s yard, a friend’s yard, and the farm

Yarn:  Mountain Meadows Cody mordanted in vinegar as per the instructions in Harvesting Color by Rebecca Burgess.

Ratio of dyestuff to fiber:  No clue.  These were some of the pokeberries preserved in vinegar that wouldn’t fit in the original poke dyepot.  So I left them in a Mason jar.  I’d guess maybe 200g of berries.  Maybe more, maybe less.  Hard to tell.  The little mini-skein of yarn weighs 6g.

Extraction:  Mashed the berries in white distilled vinegar and left them for a month out of the sunlight.

Dyebath:  Cold dyed in a Mason jar.  No sunlight.  Nine days.

The results?

The top of the dye liquid formed a white film.  Some kind of funk.  It didn’t really smell bad, though, nor did it seem to effect the colour below.  The funk rinsed off easily and didn’t seem to do anything negative to the yarn.

  Boy, is this yarn purple.  I mean PURPLE, like whoa.

It only got a little bit lighter with rinsing in plain tapwater.  It is a gorgeous colour.  And I am thankful to Pia for asking me to do this little experiment so that I could learn about yet another colour from the poke’s most unredundant bounty.

This is my favourite yet.

We’ll see if the colour lasts.  If so, this is my new go-to way to dye with pokeberries, hands down.  Pia, I hope you are happy with the pokeberry results, too.  :D

Live happy, dye happy!

At the Burrow Dyetable # 3: Children’s Class

Just finished teaching a children’s coop class on natural dyeing for my local homeschooling coop group. The kids were great, the timing went perfectly, and the dyepots were awesome.  In all, it was four hours of fun work. I am very pleased, and more importantly, I think the kids had a blast.

The Prep:

I pre-scoured, weighed and divvied, and pre-mordanted (8% alum/7% CoT) all the yarn, so we were able to jump right in.   Each child (and a couple parents) got a 20g mini-skein of yarn for each dyebath.  There were 9 participants and 4 dyebaths.  It was a lot of divvying and weighing and winding.  I did it in my pajamas in the wee hours.  Good times.

The Class:

We began with an introduction to natural dyeing:  types of fiber, dyestuffs, terms, safety, and a show-and-tell with fiber, dyestuff, and dyed samples.  I even made posters with illustrations and everything.  I love teaching.  I wish I had more time to do classes like this.

We dyed with black tea (English Breakfast, 20 bags), yellow onion skins (.75:1), red onion skins (just under 1:1), and I sent them home with a bonus black beans solar dyeing project. They had fun stuffing pantyhose legs with onion skins and weighing and calculating the ratios. They really liked getting to wear the blue gloves and using the Grackle & Sun super-scientifical gear—you know, the pH meter and temperature probe. Who wouldn’t? Lol. The real winner, though, was the awesome presto-change-oh! trick with the red onion skins. The magic of a little washing soda. Red dyebath, green yarn.  Show-stopper. :D

Quick scientifical aside here:  My tapwater is pH 8.8.  The black tea dyebath dropped to a 3.4.  The yellow onion bath went down to about a 4.1.  The red onion bath was made more basic with 1/4 teaspoon of washing soda which brought the pH up to 9.4, and that instantly turned the extraction green.  But later (after about 45 min.), the dyebath was claret coloured again.  So we remeasured the pH, and it was 3.5!  But the yarn still took the green colour.  Interesting that it dropped back down though.  Will have to play with this again later.  All the dyebaths were done as a combo extraction/dyebath deal.  The yarn and dyestuff was added at the same time.

In the down time, we took a tour of my yard and learned about various native dyeplants and their proper names. We also took a tour of the Grackle & Sun DyeTable (aka, my studio space in the garage). They called it my dyer’s lair. Funny.  And true. They loved all the different extractions and experiments going on.  I love to see the inner mad scientists of 10 year olds being engaged and encouraged.

The best part was seeing how excited they got about their successful dyepots. Mad skillz little dyers. I think a couple of them are hooked. They’re already asking for more classes and planning what dyestuffs they want to try out next. Total success. :D

The results:

Sorry for the over-exposed picture. I didn’t dye any yarn myself today, and so I tried to snap a quick picture before the kiddos had to go.  The green is actually greener, and the peach is actually browner. The yellow is pretty bang-on, though. I didn’t tell them what colour they’re going to get with the black beans though. I can just imagine the surprise when they see blue yarn. Good times. Love sharing this awesomeness we call natural dyeing.

Yellow Onion—Red Onion—Black Tea

Live happy, dye happy!

At the Burrow DyeTable # 2: Long, Long Pot of Poke

My friend Laura came over to share in the fun of this dyepot.  I figured, while it’s still giving, might as well keep sharing.  She opted to bring some superwash skeins, which is cool, because I was curious how they’d take up the dye.   For the second exhaust bath, I opted to follow the exact same procedure as in the first dyebath with one exception:  After the 2 hour simmer, I left the skeins in the dyebath—for 2 days.   I thought it might help with fastness since the amount of dye in the pot is lessening with each exhaust.  During this time, the weather went from 80-some degrees to 30-some degrees!  Way to go, crazyass Missouri weather.  Pulling those skeins out of the dyebath was cold!  I let them hang out in the chilly air for several hours, and then I brought them inside to rinse.  For all of these pokeberry dyepots, I rinsed in a bucket of water with a dash of vinegar because my water is alkaline at pH 8.8, and I was afraid of that effecting the colour.  No soap or even Soak or Eucalan.  Rinsed until the water ran clear (or I ran out of patience).

Here are the results from the second exhaust bath (which is the third overall use of this dyepot):  Notice how much darker the two skeins on the left are.  They are both superwash.  The third skein over is a mohair boucle, and the rightermost (yeah, i just said that) is more Mountain Meadows Cody wool.  That boucle’s got some shine on it.  On a technical note, it’s really hard to photograph these colours accurately.  I’ve tried to get them as true as possible, but it took some doing.

And here is the line-up of all the pokeberry dyepot results so far.  From left to right you have:  Original dyepot, 1st exhaust, 2nd exhaust superwash, and 2nd exhaust wool.

I think that it’s interesting that we’ve moved from plums and raspberries to peachy-salmon tones.  I expected the colours to stay more in the same colour family and to just get lighter and lighter.  I did not expect it to jump to a totally different hue.  Now I’m wondering what I’ll do with them.  Oh, no!  I’ve got to look at patterns!  Lolz.  I’ve got to prepare for a kid’s class that I’m teaching on Wednesday, and I need my pot back.  But I’m tempted to do just one more before I let this one go.  We’ll see.  Until then,

Live happy, dye happy!

Post Navigation